*Please enable “Menu / Edit / Preferences / Scripting & Expressions / Allow scripts to write file and access network” for activation.
*”Menu/File/Project Settings/Expressions/Expressions Engine” must be set to “JavaScript”. Normally, the default setting is “JavaScript”. This is because the script is temporarily using expression as part of the process.
Quick Start
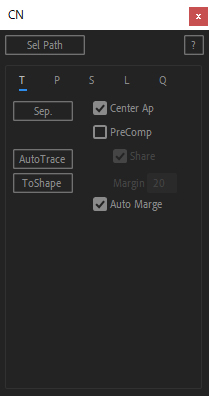
Go to T tab.
Select text and click the Sep. button.
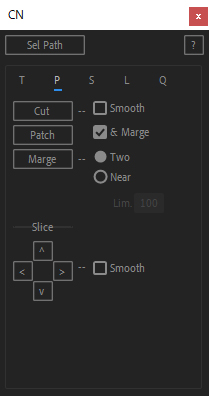
Go to P tab.
Select two path points and click the Cut button.
Do the above for the number of strokes.
*For crosses, select 4 points.
Examples: X, t, Q, etc.
*Characters with two or more paths combined should also be cut to make a single stroke.
Example; e, o, etc.
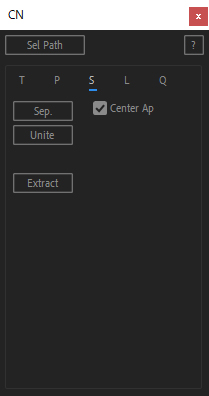
Go to S tab.
Select all shape layers and click the Sep. button.
Go to L tab.
Select all the Stroke layers and click the Auto button.
*If the Auto button does not work, process one stroke at a time.
■How to process one stroke at a time
- Select one or two start path points and click the F button.
A cyan mark will appear. - Select one or two end path points and click the L button.
An orange mark will appear. - Select a Stroke layer and click the Create button.
Do the above for the number of strokes.
Go to Q tab.
Select all Stroke layers and click the Sep. button.
Completion!
Details
Sel Path: Simply select a shape layer and click to put it in a path selection state.
?: Information about this script will be displayed.
T tab: Text
| Buttons | |
| Sep. | Make text into character paths. |
| AutoTrace | Invokes the auto-trace function. |
| ToShape | Turn the auto-traced mask layer into shape paths. If you want to separate the text into characters, select the original text layer together before executing. |
| Options | |
| Center Ap | Move the anchor point to the center of the character. |
| PreComp | Put each character in each composition. Shere: Combine the same characters into one composition. Margin: Composition margins. |
| Auto Merge | Automatically merge proximity points into one. |
*Most functions work even if each character is in its own composition.
There is no need to bother opening character compositions except for Cut work and manual line creation.
P tab: Path
| Buttons | |
| Cut | Make character paths into stroke paths. |
| Patch | Restore the cut path. Select the cut path point again and click. |
| Merge | Merge proximity points. If two, select two adjacent path points and click. If Near, select a path and click. |
| Slice | Slice the path in 4 directions. Select one path point and click. |
| Options | |
| Smooth | For Cut and Slice. Smooth the cut. |
| & Merge | For Cut and Slice. Merge proximity points before processing. *Because some fonts have points very close to each other, and sometimes “two points are actually selected when one point is supposed to be selected”. *It will not work if the selection points are adjacent to each other. To work around this, temporarily uncheck the box. Or add one point between two points before cutting. |
| Two | For Merge. Merge two adjacent path points. |
| Near | For Merge. Merge all path points according to the distance limit. Lim: Distance limit. |
S tab: Shape
| Buttons | |
| Sep. | Make stroke paths into stroke layers. |
| Unite | Restore stroke layers. Select all the stroke layers and click. |
| Extract | Make only one stroke path into a stroke layer. Select the stroke path to be extracted and click. |
| Options | |
| Center Ap | Move the anchor point to the center of the stroke. |
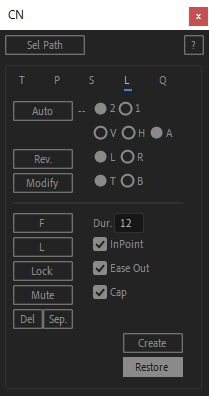
L tab: Line
| Buttons (about Automatic) | |
| Auto | Make stroke layers into line animations automatically. The following slider control parameters are applied to the layers. ■For animation CN_Slider: For adjusting keyframes for animation. ■For rounding tip CN_TipHeight: Height of rounding tip. CN_TipDecayF: Time for the tip to finish rounding. CN_TipDecayL: Time when the tip begins to lose its roundness. |
| Rev. | Reverse the resulting line. Select a line and click. |
| Modify | Restore all but the start and end marks of the completed line. Select a line and click. *If the Auto button does not work, press this button, then re-select the start and end points, and use the Create button to manually create the line. *Multiple selections are not allowed. |
| Options (about Automatic) | |
| 2,1 | Specify the number of start and end points. Select 2 for sans-serif fonts and 1 for other fonts. |
| V,H,A | Prioritize the animation direction. V: vertical (Y direction) H: Horizontal (X direction) A: automatic When the stroke is long horizontally, H priority is given; when the stroke is long vertically, V priority is given. *Use according to the language of the font used. |
| L,R | When V,H,A is H, it determines which side has priority, left or right. |
| T,B | When V,H,A is V, it determines which has priority, up or down. |
| Buttons ( about Manual operation ) | |
| F | Determine the start point. Select one or two path points and click. A cyan mark will appear. |
| L | Determine the end point. Select one or two path points and click. An orange mark will appear. |
| Lock | Determine a valid point as a pathway. Select a path point and click. A blue mark will appear. |
| Mute | Determine the invalid point as a pathway. Select two path points as a set and click. A red mark will appear. |
| Del | Delete F, L, Lock, and Mute marks. Select the marked point and click. |
| Sep. | Space the points where they overlap. Select the overlapping points and click. *Used when you want to make a selection but can’t because of overlapping points. Example: e,o, etc. |
| Create | Create a line animation. Select a stroke layer and click. |
| Restore | Restores the line animation created by the Create button. Select a stroke layer and click. |
| Options ( about Manual operation ) | |
| Dur. | Determine the duration of the animation. |
| inPoint | The animation starts at the in point of the layer. Unchecking the box will be from the indicator. |
| Ease Out | Ease out animation. |
| Tip | Round the tip of the animation. |
*The Options ( about Manual operation ) is also referenced by the Buttons (about Automatic).
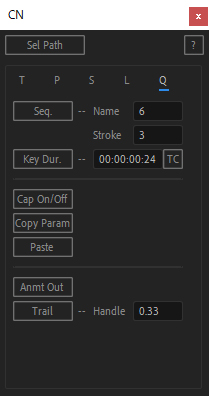
Q tab: Sequence
| Buttons | |
| Seq. | Sequence lines. |
| Key Dur. | Change the keyframe duration. Select Line Layers and click. |
| Tip On/Off | Turn on/off rounding tip. |
| Copy Param | Copy the slider control parameters for rounding tip. Select the slider control parameter and click. |
| Paste | Paste the slider control parameters for rounding tip. Select Line Layers and click. |
| Anmt Out | Create an animated out composition. Select the timeline composition you worked on and click. The composition is copied and becomes an animated out composition. *It is not possible to create an animated out composition by selecting a composition in the project panel. |
| Trail | Create a trail path. Select the line layers and click. *Trail is based on CN_Bones, which are created when the lines are created. |
| Options | |
| Name | Determine the time gap between characters. |
| Stroke | Determine the time gap between strokes. |
| Key Dur. | Determine the duration of the keyframe. |
| TC/F | Converts the time format of Key Dur. TC: time code F: frame |
| Handle | Determine how the stroke trails are connected. The higher the value, the greater the bend. If it is zero, it is a straight line. The default value is 0.33. |
Verified Fonts
■English font
Futura PT Medium
Verified characters: Upper and lower case alphabetical characters
(ABCDEFGHIJKLMNOPQRSTUVWXYZabcdefghijklmnopqrstuvwxyz)
■Japanese font
Source Han Sans Regular
Verified characters: Adobe font sample sentence
*This does not mean that it will not work with other than verified fonts.
Tips & Notes
■Freeze while creating line animation
In windows, when creating an automatic line animation, if there are too many characters, you may get a “Not Responding” message.In many cases, the process is being carried out normally, so please wait.
■How to manually adjust line animation
The angle of the tip can be adjusted by “Offset” of CN_Trim in the shape properties.
Remember to hit the keys at the beginning and end of the animation.
■How to reliably animate serif fonts
If you want to have “two starting and ending points in a serif font,
that is, if you want to animate strokes containing T-ornaments exactly,
the automatic line creation button does not work.
This case requires a certain amount of work, but it is not without method.
The basic idea is to “make the automatic line creation button think it is a sans-serif” and “mask the resulting line animation with the original text layer.
- First, proceed to the stage of creating the line animation.
- Manually simplify the ornaments.
The indentation of the T-shape should be as loose as possible.
Then, if there are points between the two starting or ending points, it is erased.
There must be no handles at the two starting or ending points.
At this point, you may want to bring the original text layer to the top, add color and reduce opacity to use it as a guide for checking overflow. Make sure that no part of the image goes inside the original text layer. - Create an animation with the Auto button.
If the selection does not work, manually re-select the starting and ending points. - When you have finished working on all the stroke layers, The original text layer is made into a mask.
Restore the color and opacity of the original text layer and set the mode to Stencil Alpha.
Or, if you are using a version that allows you to choose a track matte, make the layer to be used as the matte the original text layer.
■How to create brush font animations
Brush fonts have a very large number of path points and would take too long to process if handled as is.
So, use the AutoTrace and ToShape buttons to auto-trace the original text layer before creating the character path.
The recommended auto trace settings are as follows:
- Channel: Alpha
- Blur: None
- Tolerance: 2 px
- Threshold: 0.0001 px
- Minimum Area: As appropriate (small paths will disappear as you increase the value)
- Corner Roundness: 0 %
Working with this path, proceed to the stage of creating the line animation.
Next, manually smooth the following areas:
- Where the shape of the path is finely wavy
- Wavy start and end points
If you create an animation with these in place, the lines will move back and forth.
Wave edges should be rounded and smooth.
At this point, you may want to bring the original text layer to the top, add color and reduce opacity to use it as a guide for checking overflow. Make sure that no part of the image goes inside the original text layer.
When you are done, create a line. Finally, make the original text layer a mask.
Restore the color and opacity of the original text layer and set the mode to Stencil Alpha.
Or, if you are using a version that allows you to choose a track matte, make the layer to be used as the matte the original text layer.
By using the original text layer as a mask, the animation can be created without significantly damaging the original shape.
■Using CuttanaNir for more than just text stroke animation
CuttanaNir can handle Shape paths, even if they are not created from text.
So, for example, you can cut and extract any part of an icon made of shape paths and animate it.
You can also use AutoTrace and the ToShape button to turn an auto-traced layer into a shape.
The source of the auto trace does not have to be text.
■About Round Font
CuttanaNir’s rounding tip is designed to decay at the start and end points.
So, to make sure that the animation ends with the rounding tip of the rounded font remaining rounded to the end, do the following.
After creating the animation, set CN_TipDecayL in the Effect Panel of any one layer to zero.
Use the CopyPram and Paste buttons to copy and paste the CN_TipDecayL values to all layers.
This way, the last decay is eliminated.
However, the rounded tip covers the shape before the animation ends, so it appears that the animation ends before the keyframe ends. Adjust the duration accordingly using the Key Dur. button.
■About Trail Path
The Trail button allows you to create a Trail path.
but the work of turning trail paths into motion paths and timing the motion and line animations must be done manually.
■Fonts not supported without manual modification
Font with wavy start and end points.
Fonts with wavy strokes.