*Please enable “Menu / Edit / Preferences / Scripting & Expressions / Allow scripts to write file and access network” for activation.
Summary
STEP
Separate the text.
Select the text layer.
Click on “Separate” in “Text”
to separate each letter one at a time from the whole word.
STEP
Cut the path.
Switch to “Path”.
In the case of a cross, select the four points
and click on “Cut”
to separate one path from the other path!
Of course, a two-point split is also possible.
Cut the other letters in this way as well.
STEP
Separate the shape.
Switch to “Shapes”.
Select all letters and click on “Separate”
to split the layers of each path.
Details
STEP
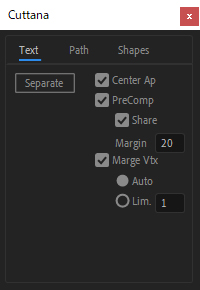
Separate the text.
- When “Center Ap” is checked in “Text”, each anchor point will be moved to the center of each letter.
- When “PreComp” is checked, each letter will be separated into its own composition.
- If “Share” is checked, the same letters in a text will be shared as the same composition. This is recommended because you will not have to cut the same letters over and over again.
- When a number is entered in ”Margin”, each letter composition will have it’s own margin.
- When “Marge Vtx” is checked, the proximity points can be combined into one.
- You can adjust the distance yourself with “Lim.”, but be careful not to overdo it or shapes will be deformed.
STEP
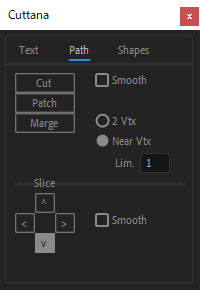
Cut the path.
- “Patch” in the “Path” tab returns the cut point to its original state. Note that it is not a tool to connect distant points, but only a tool to fix the cut.
- When “Smooth” is checked, the cut surface is smoothed.
- “Merge” is almost the same as the merge function in the Text tab, but when “2 Vtx” is checked, you can specify two points and combine them into one point.
- “Slice” means that if you want to cut straight upward from the point, for example, you can do so even if there is no point above it.
STEP
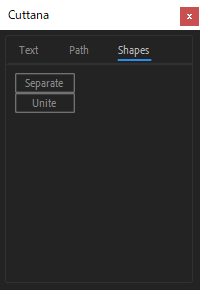
Separate the shape.
- “Unite” in the shapes tab will unite the layers that were separated by “Separate”.
- The two buttons in the Shape tab will also work when each letter shape is in each composition.
Verified fonts
Source Han Sans Regular
Futura PT Medium
New features
STEP
“& Marge”


- If you check “& Marge“, you can cut the proximity points after collecting them. It is a function that cuts as intended when “actually, if you choose 2 points instead of 1 point”.
- It will not work if the selection points are next to each other.(Because two adjacent points are treated as one point internally). The figure is an example to show it.
- To avoid this, temporarily uncheck “& Marge” or add one point between the two points before cutting.